画面ニックネームを作成する
画面ニックネームの作成はテストを容易にするために重要です。
ユニークな画面識別子を定義するにはいくつかのパターンがあります。
- 固定レイアウト
- スクロールするレイアウト(固定ヘッダあり)
- スクロールするレイアウト(固定ヘッダなし)
後ろのものの方が難易度は高くなります。
例1: 固定レイアウト
Androidの設定アプリを開きます。
[Connected devices Screen]の例で説明します。

screensディレクトリを作成します(存在していない場合)。[Connected devices Screen].jsonという名前でファイルを作成します。
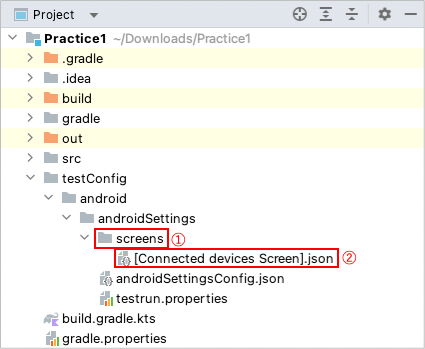
- 以下のように内容を編集します。 key はファイル名(拡張子なし)と同じにする必要があります。 ( 参照 画面ニックネーム )
{
  "key": "[Connected devices Screen]",

  "identity": "",

  "selectors": {
  }
}
-
Appium Inspectorで
Connected Devices画面をキャプチャします。 ( 参照 Appium Inspectorを使用する)- appiumを起動します。
- Android 12のエミュレーターを起動します。
- Appium Inspectorを起動します。
- Android 14のエミュレーター向けにcapabilitiesを編集し、
Start Sessionをクリックして設定アプリのセッションを開始します。 - エミュレーターで
Connected devicesをタップします。 - Appium Inspectorで
Refresh source & screenshotをクリックしてConnected devices画面をキャプチャします。
-
画面を見ながらセレクターの名前を定義します。この時点では値は""(空文字)でかまいません。

{
  "key": "[Connected devices Screen]",

  "identity": "",

  "selectors": {
    "[<-]": "",
    "[Connected devices]": "",
    "[+]": "",
    "[Pair new device]": "",
    "[Previously connected devices]": "",
    "[>]": "",
    "[See all]": "",
    "[Connection preferences]": "",
    "{Connection preferences}": "",
    "[i]": "",
    "{Information}": ""
  }
}
- 各要素を精査しユニークな属性を探します。 (参照 セレクター式)
[<-]は content-descが ’Navigate up’であるという条件で唯一に決定することができます。
これにより アクセシビリティフィルター を使用して以下のようにセレクターを定義できます。"[<-]": "@Navigate up"[Connected devices]はcontent-descが ’Connected devices’であるという条件で唯一に決定することができます。
これにより アクセシビリティフィルター を使用して以下のようにセレクターを定義できます。"[Connected devices]": "@Connected devices"[Pair new device]はテキストによって唯一に決定することができます。
これにより テキストフィルター を使用して以下のようにセレクターを定義できます。"[Pair new device]": "Pair new device"
この場合、テキストがニックネームから括弧を除いたラベルと一致するので、値の指定は省略できます。 ( 参照 セレクターニックネーム)"[Pair new device]": ""[+]は属性値によって唯一に決定することはできません。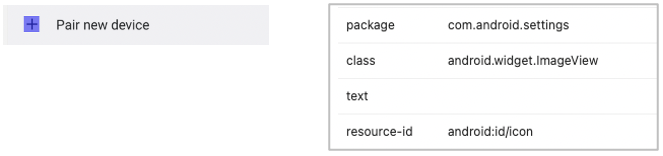
この場合は相対セレクター の使用を検討します。:leftImageを使用するとセレクターを以下のように定義できます。 参照 相対セレクター(方向ベース)"[+]": "[Pair new device]:leftImage"[Connection preferences]はテキストによって唯一に決定することができます。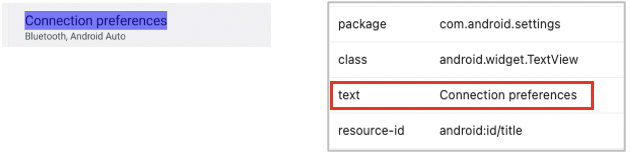
テキストフィルターを使用して以下のようにセレクターを定義できます。"[Connection preferences]": ""Bluetooth, Android Autoは[Connection preferences]の動的なコンテンツであり、その属性によって唯一に決定することはできません。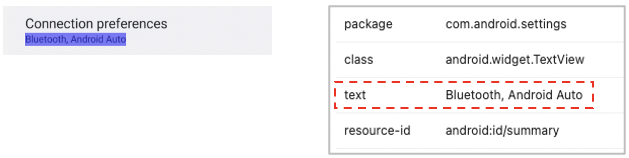
この場合は相対セレクター の使用を検討します。:belowLabelを使用するとセレクターを以下のように定義できます。 参照 相対セレクター(方向ベース)"{Connection preferences}": "[Connection preferences]:belowLabel"- その他の要素についてもAppium Inspectorで精査し、全てのセレクターニックネームを編集した結果、以下のようなセレクターとなりました。
{
  "key": "[Connected devices Screen]",

  "identity": "",

  "selectors": {
    "[<-]": "@Navigate up",
    "[Connected devices]": "@Connected devices",
    "[+]": "[Pair new device]:leftImage",
    "[Pair new device]": "",
    "[Previously connected devices]": "",
    "[>]": "[See all]:leftImage",
    "[See all]": "",
    "[Connection preferences]": "",
    "{Connection preferences}": "[Connection preferences]:belowLabel",
    "[i]": "{Information}:aboveImage",
    "{Information}": "Visible as *"
  }
}
- セレクターニックネームを結合してユニークな識別子を作成して
identityに設定します。
{
  "key": "[Connected devices Screen]",

  "identity": "[Connected devices][Pair new device][See all]",

  "selectors": {
    "[<-]": "@Navigate up",
    "[Connected devices]": "@Connected devices",
    "[+]": "[Pair new device]:leftImage",
    "[Pair new device]": "",
    "[Previously connected devices]": "",
    "[>]": "[See all]:leftImage",
    "[See all]": "",
    "[Connection preferences]": "",
    "{Connection preferences}": "[Connection preferences]:belowLabel",
    "[i]": "{Information}:aboveImage",
    "{Information}": "Visible as *"
  }
}
kotlin/exerciseディレクトリの下にConnectedDevicesTest.ktを作成します。
package exercise

import org.junit.jupiter.api.Test
import shirates.core.configuration.Testrun
import shirates.core.driver.commandextension.*
import shirates.core.testcode.UITest

@Testrun("testConfig/android/androidSettings/testrun.properties")
class ConnectedDevicesTest : UITest() {

    @Test
    fun test1() {

        scenario {
            case(1) {
                condition {
                    it.tap("Connected devices")
                }.expectation {
                    it.screenIs("[Connected devices Screen]")
                        .exist("[<-]").accessIs("Navigate up")
                        .exist("[Connected devices]").accessIs("Connected devices")
                        .exist("[+]").classIs("android.widget.ImageView")
                        .exist("[Pair new device]").textIs("Pair new device")
                        .exist("[Previously connected devices]").textIs("Previously connected devices")
                        .exist("[>]").classIs("android.widget.ImageView")
                        .exist("[See all]").textIs("See all")
                        .exist("[Connection preferences]").textIs("Connection preferences")
                        .exist("{Connection preferences}").textIs("Bluetooth, Android Auto")
                        .exist("[i]").classIs("android.widget.ImageView")
                        .exist("{Information}").textStartsWith("Visible as ")
                }
            }
            case(2) {
                action {
                    it.tap("[<-]")
                }.expectation {
                    it.exist("Network & internet")
                }
            }
        }
    }

}
- テストを実行します。正しく設定されている場合は以下のようなHTMLレポートが出力されます。

例2: スクロールするレイアウト(固定ヘッダあり)
Androidの設定アプリを起動します。
[Network & internet Screen]を例に説明します。

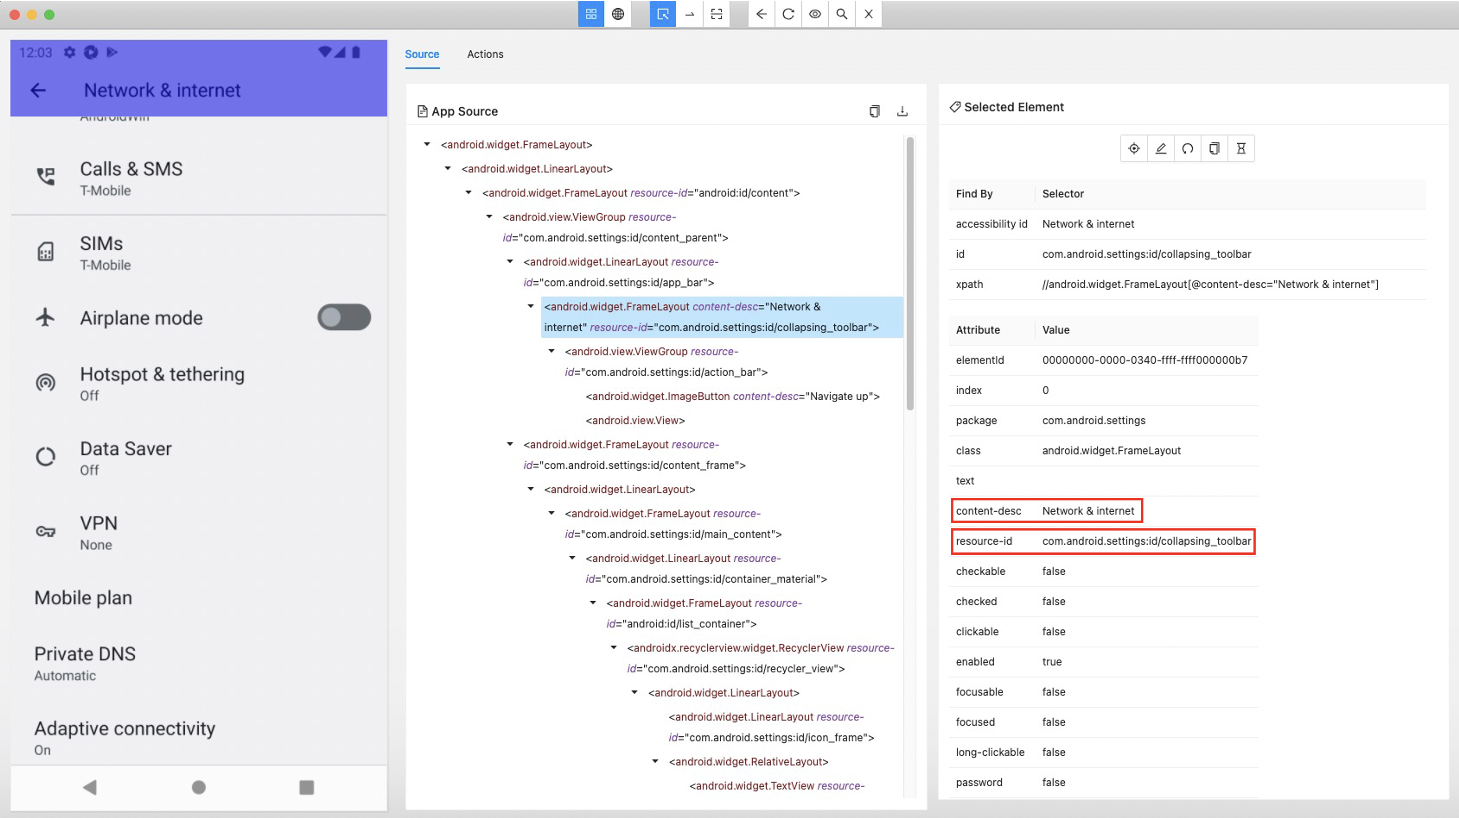
この画面はスクロール可能であり、固定ヘッダとして<#collapsing_toolbar>を持ちます。この場合、identityを以下のように設定できます。
{
  "key": "[Network & internet Screen]",

  "identity": "#collapsing_toolbar&&@Network & internet",
これで十分動作しますが、titleセレクターを使用するともっと簡単になります。 ( 参照 titleセレクター)
{
  "key": "[Network & internet Screen]",

  "identity": "~title=Network & internet",
[Network & internet Screen]向けの画面ニックネームは以下のように記述することができます。
[Network & internet Screen].json
{
  "key": "[Network & internet Screen]",

  "include": [
  ],

  "identity": "~title=Network & internet",

  "selectors": {
    "[<-]": "@Navigate up",
    "[Network & internet]": "@Network & internet",

    "[Internet]": "",
    "{Internet}": "[Internet]:label",

    "[Calls & SMS]": "",
    "{Calls & SMS}": "[Calls & SMS]:label",

    "[SIMs]": "",
    "{SIMs}": "[SIMs]:label",

    "[Airplane mode]": "",
    "{Airplane mode switch}": "[Airplane mode]:switch",

    "[Hotspot & tethering]": "",
    "{Hotspot & tethering}": "[Hotspot & tethering]:label",

    "[Data Saver]": "",
    "{Data Saver}": "[Data Saver]:label",

    "[VPN]": "",
    "{VPN}": "[VPN]:label",

    "[Mobile plan]": "",
    "{Mobile plan}": "[Mobile plan]:label",

    "[Private DNS]": "",
    "{Private DNS}": "[Private DNS]:label",

    "[Adaptive connectivity]": "",
    "{Adaptive connectivity}": "[Adaptive connectivity]:label",

  },

  "scroll": {
    "start-elements": "",
    "end-elements": "[Adaptive connectivity]",
    "overlay-elements": ""
  }
}
:label
この例では相対セレクターとして:belowLabelではなく:labelを使用しています。:labelはウィジェットフローの最初のlabelを選択します。
:switch
相対セレクター:switchはウィジェットフローの最初のswitchを選択します。
“scroll” section
`"scroll"セクションは最適化のために使用します。(オプション)
start-elements と end-elements はスクロールの終端位置を効率よく検出するためのものです。 参照 スクロール終端位置の検出の最適化
overlay-elements はオーバーレイを検出するためのに使用します。 オーバーレイの下にある要素は表示されていないものとみなします。
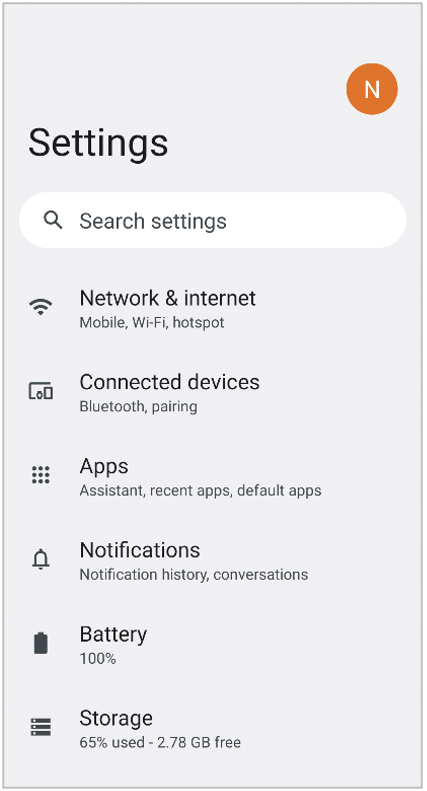
例3: スクロールするレイアウト(固定ヘッダなし)
Androidの設定アプリを開きます。
[Android Settings Top Screen]を例に説明します。
- shirates-coreプロジェクトを開きます。
testConfig/android/androidSettings/screensの下にある[Android Settings Top Screen].jsonを開きます。
{
  "key": "[Android Settings Top Screen]",

  "identity": "#recycler_view",
  "satellites": [
    "Battery",
    "Accessibility",
    "Passwords & accounts",
    "Tips & support"
  ],

  "selectors": {
    "[Account Avatar]": "#account_avatar",
    "[Settings]": "#homepage_title",

    "[Search Button]": "<#search_action_bar>:inner(1)",
    "[Search settings]": "#search_action_bar_title",

    "[Network & internet]": "",
    "{Network & internet}": "[Network & internet]:label",
    "[Network & internet Icon]": "[Network & internet]:leftImage",

    "[Connected devices]": "",
    "{Connected devices}": "[Connected devices]:label",
    "[Connected devices Icon]": "[Connected devices]:leftImage",

    "[Apps]": "",
    "{Apps}": "[Apps]:label",
    "[Apps Icon]": "[Apps]:leftImage",

    "[Notifications]": "",
    "{Notifications}": "[Notifications]:label",
    "[Notifications Icon]": "[Notifications]:leftImage",

    "[Battery]": "",
    "{Battery}": "[Battery]:label",
    "[Battery Icon]": "[Battery]:leftImage",

    "[Storage]": "",
    "{Storage}": "[Storage]:label",
    "[Storage Icon]": "[Storage]:leftImage",

    "[Sound & vibration]": "",
    "{Sound & vibration}": "[Sound & vibration]:label",
    "[Sound & vibration Icon]": "[Sound & vibration]:leftImage",

    "[Display]": "",
    "{Display}": "[Display]:label",
    "[Display Icon]": "[Display]:leftImage",

    "[Wallpaper & style]": "",
    "{Wallpaper & style}": "[Wallpaper & style]:label",
    "[Wallpaper & style Icon]": "[Wallpaper & style]:leftImage",

    "[Accessibility]": "",
    "{Accessibility}": "[Accessibility]:label",
    "[Accessibility Icon]": "[Accessibility]:leftImage",

    "[Security & privacy]": "",
    "{Security & privacy}": "[Security & privacy]:label",
    "[Security & privacy Icon]": "[Security & privacy]:leftImage",

    "[Location]": "",
    "{Location}": "[Location]:label",
    "[Location Icon]": "[Location]:leftImage",

    "[Safety & emergency]": "",
    "{Safety & emergency}": "[Safety & emergency]:label",
    "[Safety & emergency Icon]": "[Safety & emergency]:leftImage",

    "[Passwords & accounts]": "",
    "{Passwords & accounts}": "[Passwords & accounts]:label",
    "[Passwords & accounts Icon]": "[Passwords & accounts]:leftImage",

    "[Digital Wellbeing & parental controls]": "",
    "{Digital Wellbeing & parental controls}": "[Digital Wellbeing & parental controls]:label",
    "[Digital Wellbeing & parental controls Icon]": "[Digital Wellbeing & parental controls]:leftImage",

    "[Google]": "",
    "{Google}": "[Google]:label",
    "[Google Icon]": "[Google]:leftImage",

    "[System]": "",
    "{System}": "[System]:label",
    "[System Icon]": "[System]:leftImage",

    "[About emulated device]": "",
    "{About emulated device}": "[About emulated device]:label",
    "[About emulated device Icon]": "[About emulated device]:leftImage",

    "[About phone]": "",
    "{About phone}": "[About phone]:label",
    "[About phone Icon]": "[About phone]:leftImage",

    "[Tips & support]": "",
    "{Tips & support}": "[Tips & support]:label",
    "[Tips & support Icon]": "[Tips & support]:leftImage",

    "[:Summary]": ":belowLabel"
  },

  "scroll": {
    "header-elements": "[Search Button][Search settings]",
    "overlay-elements": "",
    "start-elements": "[Network & internet]",
    "end-elements": "{Tips & support}"
  }
}
“identity” と “satellites”
画面のidentityを構成する要素に常にアクセスできるならば、それらの要素をidentityとして使用すべきです。 上述の例1 と 例2 がこれに該当します。
そのような要素に常にアクセスできない場合は、他の方法を検討する必要があります。
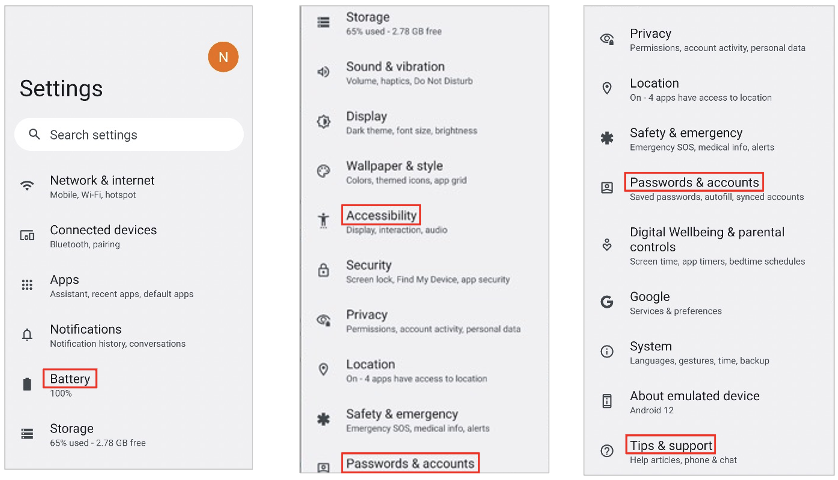
[Android Settings Top Screen]の場合は上下にスクロール可能です。
この画面は固定ヘッダを持っていません。スクロールする際に"identity"として使用可能な位置が固定された要素はありません。 この場合、"satellites"を指定して画面の識別がユニークになるようにすることができます。 "satellitesはセレクターのリストです。
[Android Settings Top Screen].jsonにおいては、"identity" と "satellites"を以下のように指定することができます。
{
  "key": "[Android Settings Top Screen]",

  "identity": "#recycler_view",
  "satellites": ["Battery", "Accessibility", "Passwords & accounts", "Tips & support"],
...
これにより、画面が"#recycler_view"を持ち、"Battery", "Accessibility", "Passwords & accounts" or "Tips & support" のうち 少なくとも一つが画面上に存在している場合、"[Android Settings Top Screen]"とみなされます
identity と satellite keyから構成される複合キーが固有である必要があります。